

You look at your car straight-on in the car park and there it is: the headlights are no longer clear, they have gone a flat yellowish colour, as if there is a haze sitting inside them. The natural reaction is to think 'ah, it is just cosmetic, I will sort it someday.' That is exactly the mistake, because the real problem is invisible in daylight.
The figure comes from AAA, who tested headlights from cars around eleven years old in an accredited laboratory using the FMVSS 108 standard: a degraded headlight puts out around 22 % of the light it produced when new on dipped beam. Not slightly less — less than a quarter. You have been driving at night for years with a headlight that is barely functioning, and because the deterioration is so gradual — it starts at three to five years — your eyes have quietly adjusted without you noticing.
Why they yellow: it all comes down to a 5-micron coating
Modern headlights are not glass — they are polycarbonate. The switch to plastic happened in the eighties for three reasons: it weighs less than half as much as glass, it can be moulded into shapes glass cannot, and it survives a stone chip without shattering.
The catch is that bare polycarbonate and sunlight do not get on. So from the factory every lens gets two layers: an acrylic primer of 1 to 4 microns that carries the UV absorbers, topped with a polysiloxane hardcoat of 4 to 8 microns. Add it up: your entire headlight protection is between 5 and 12 microns. About a tenth of the thickness of a human hair.
And that coating is a consumable. The UV absorbers literally wear out, the lacquer micro-cracks and delaminates, and only then — when the polycarbonate is left exposed — does the yellowing begin. That is why all cars of a similar age yellow at roughly the same time.
The good news: the damage is external and superficial, in the order of 25 microns. The proof is that sanding the outside fixes it; if the yellowing were internal or went through the full thickness, nothing would.
When it CANNOT be fixed (check this before you buy anything)
There are two faults that get confused with yellowing and that no amount of polishing will solve, because they are on the inside:
- Water ingress. Worth knowing: a headlight misting up briefly and then clearing on its own is normal — headlights have breather vents to equalise pressure. It becomes a fault when you see droplets, a waterline, or a haze that never clears.
- A degraded reflector. If the chrome inner surface has lost its aluminising and looks dull or scorched, the headlight needs replacing.
Quick workshop trick to settle the question in ten seconds: wet the outside face of the headlight with water. If it clears and looks more transparent while it is wet, the damage is external and can be restored. If it looks just as cloudy, look deeper.
What the NCT actually looks at (most blogs get this wrong)
You will read all over the place that 'yellow headlights will fail the NCT.' That is an oversimplification. Under EU Directive 2014/45/EU, Annex I, point 4.1.1(b), a 'slightly defective projection system (reflector and lens)' is classified as a MINOR defect, while a 'seriously defective' one is a MAJOR defect. Here is what that means in practice:
| Condition | Description | Classification |
|---|---|---|
| Slightly defective | Lens or reflector noticeably degraded but beam pattern still distinguishable | Minor — inspection passes |
| Seriously defective | Opacity affects function — no defined beam, just a uniform white glow | Major — fail |
In other words: a headlight with run-of-the-mill yellowing is recorded as a minor defect and the car passes. The jump to major happens when the cloudiness already affects the function of the light. Inspectors describe it quite vividly: if you can still make out a beam, even through a translucent lens, it is minor; when what you see is no longer a beam but a uniform white blob, it is major and the car fails.
It is a margin that only ever shrinks. Today it is minor — and because the deterioration never stops, by the next NCT it may no longer be.
Two more things worth knowing, because a lot of myths circulate:
- There is no legal minimum lux figure for dipped beam at the NCT. Nobody is going to measure the brightness of your headlight. The condition check is visual.
- Lighting and signalling is the single biggest cause of failures at periodic inspections across Europe — representing 22.6 % of all major defects in recent Spanish/European reference data.
On the question of legality, there is one distinction worth understanding that almost nobody explains clearly: polishing is not the same as tinting.
EU Directive 2014/45/EU, Annex I, penalises 'products on the lens that reduce light or change its colour.' Notice the word: on. It is talking about adding something — a film, a vinyl wrap, a paint. Restoring a headlight does the exact opposite: it removes the degraded layer to bring the lens back to its original transparency. That is a fundamentally different action, and it is not covered by that point.
That said, the specific rules around DIY vehicle maintenance vary from country to country — it is worth a quick check with your local NCT centre or the Road Safety Authority to make sure you are good to go in Ireland.
What will earn you a major defect is a different matter entirely: fitting a non-homologated headlight, putting LED bulbs into a housing designed for halogen, or applying tinted films or vinyls to the lens. Those are genuinely prohibited — not just here, but across the EU.
One practical note while you are sanding: leave the homologation markings alone. Those are the moulded letters and numbers on the plastic — including 'PL'. If aggressive sanding makes them illegible, you are opening yourself up to a 'non-approved device' finding, which is a major defect. More on where to find them below.
Restore or replace: the numbers
This is where the decision makes itself. The figures below are real aftermarket prices for a new headlight unit — listed here as Spanish/European reference figures since Irish prices will vary — excluding labour:
| Model | Halogen headlight | LED / Xenon headlight |
|---|---|---|
| Golf VII (2012-17) / Golf VIII | 118 € | 334 – 807 € |
| León III / León IV | 148 € | 405 € |
| Clio IV / Clio V | 101 – 144 € | 340 – 389 € |
| Corsa D / Corsa F | 91 € | 482 € |
Add labour — the average workshop rate in Spain runs around 44 EUR/h, and Irish rates tend to be higher — and a halogen headlight swap lands you somewhere between 135 and 250 €. If your car has LED units, expect 400 to 900 €. And if it is a modern full-LED setup from the dealer, some units run well past 1,000 € per side.
A polymer restoration kit costs under 25 EUR and covers both headlights with liquid to spare. The maths does itself.
Why cheap 'headlight polish' kits last about five minutes
This is the most important part of the article, and almost nobody talks about it.
Restoring a headlight means sanding down to virgin polycarbonate. The process itself removes whatever was left of the factory protective coating. And that is precisely the trap in kits that only include polishing compound.
The numbers are unambiguous. In the SAE J576 ageing test — three years of real sun exposure in Florida and Arizona — bare polycarbonate reaches 25-35 % haze, while the same polycarbonate with a UV inhibitor stays at 6 %. A factor of four to six.
The uncomfortable but honest conclusion: if you sand and do not seal, you leave the headlight less protected than it was from the factory, and it will yellow again faster than the first time. Consumer Reports tested budget kits and found that many lenses had started to haze over again before the year was out.
That is why the critical step is not the sanding — anyone can do that — but the sealing afterwards. A headlight that has been sanded and sealed with polymer will hold up for around 3 years before needing another pass.
One bonus warning: do not run an abrasive kit over a headlight that is still clear. You will not improve it — you will damage it.
How to do it, step by step
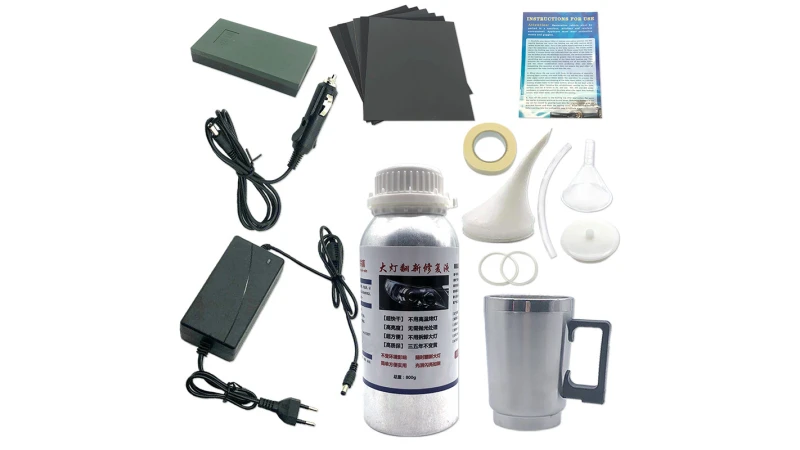
The liquid polymer restoration kit — the TSX TOOL — has everything you need: 800 ml of polymer liquid, six sanding sheets in different grits, masking tape, a sanding block, a vaporiser cup, and both mains and cigarette lighter adaptors. Set aside a relaxed morning.
One thing you will thank yourself for later: the 800 ml of polymer goes well beyond a single car. When the liquid runs out you do not need to buy the whole kit again — the sanding sheets, the block and the cup will last — because we sell the liquid polymer separately, in an 800 ml bottle. Much better value, and exactly what you need if you are doing the whole family fleet or if the results are so good you end up doing your neighbours' cars too.
- Wash the headlight thoroughly and dry it. Any grain of grit left on the surface will scratch the plastic the moment you start sanding.
- Mask off everything around the headlight with masking tape: bodywork, grille, bumper. Be generous — sandpaper does not forgive paintwork. And avoid the homologation markings on the lens (look for moulded letters and numbers, including 'PL'); do not sand over them.
- Sand wet, from coarse to fine grit, working through the sheets in order and using the sanding block to avoid uneven pressure. Plenty of water, light pressure. Between each grit, rinse and dry: the lens should be uniformly matte, with no bright patches or yellow areas remaining. A shiny spot means you have not reached that area yet.
- Clean and dry completely. Not a drop of water, not a speck of dust. Sealing is like painting: whatever is underneath stays there permanently.
- Apply the polymer using the vaporiser cup, in thin crossed passes. The headlight goes from matte to clear right before your eyes — this is the satisfying bit.
- Leave it to cure without touching it or getting it wet, somewhere out of the dust.
Two trade tips: work in the shade with a cold headlight, because in direct sun the product dries before it can settle; and use good raking light to really check whether the sanding is even — in flat daylight you will miss the patchy areas.
Protection: this bit is not optional
You are sanding plastic wet-and-dry and then vaporising a chemical product. Wear a dual-cartridge respirator mask with goggles, and work somewhere well ventilated. It is the step everyone skips and the only one you genuinely should not.
What you need
- Liquid polymer headlight restoration kit (800 ml) — TSX TOOL — everything included: sanding sheets, tape, block, vaporiser cup and adaptors. Covers several cars.
- Liquid polymer refill bottle (800 ml) — the top-up. If you already have the kit and have only run out of liquid, or if you are restoring multiple cars, just buy the bottle: no point paying for the accessories again.
- Dual-cartridge respirator mask with goggles — essential for the vaporising stage.
- LED workshop torch with magnetic base — for checking the sanding under raking light so there are no nasty surprises.
If you have caught the bug for doing your own car maintenance, have a look at our specialist automotive tools and car accessories.
One last thing about driving at night
To be clear: there is no study that directly proves yellowed headlights cause accidents, and we are not going to claim otherwise. What there are is two separate facts.
One: data from Spanish road safety records (2024), cited here as a European reference. In conditions of complete darkness — those roads where your headlights are the only light there is — 8.4 % of injury accidents occur, but they account for 21.2 % of fatalities. The death rate in the dark is nearly three times that in full daylight.
And two: your headlight, if it is yellow, is putting out around 22 % of the light it was designed to produce. You can join those dots yourself.
Restoring them takes a morning and under 25 EUR. It is one of the rare things on a car where such a small effort makes such a noticeable difference.